Prediction
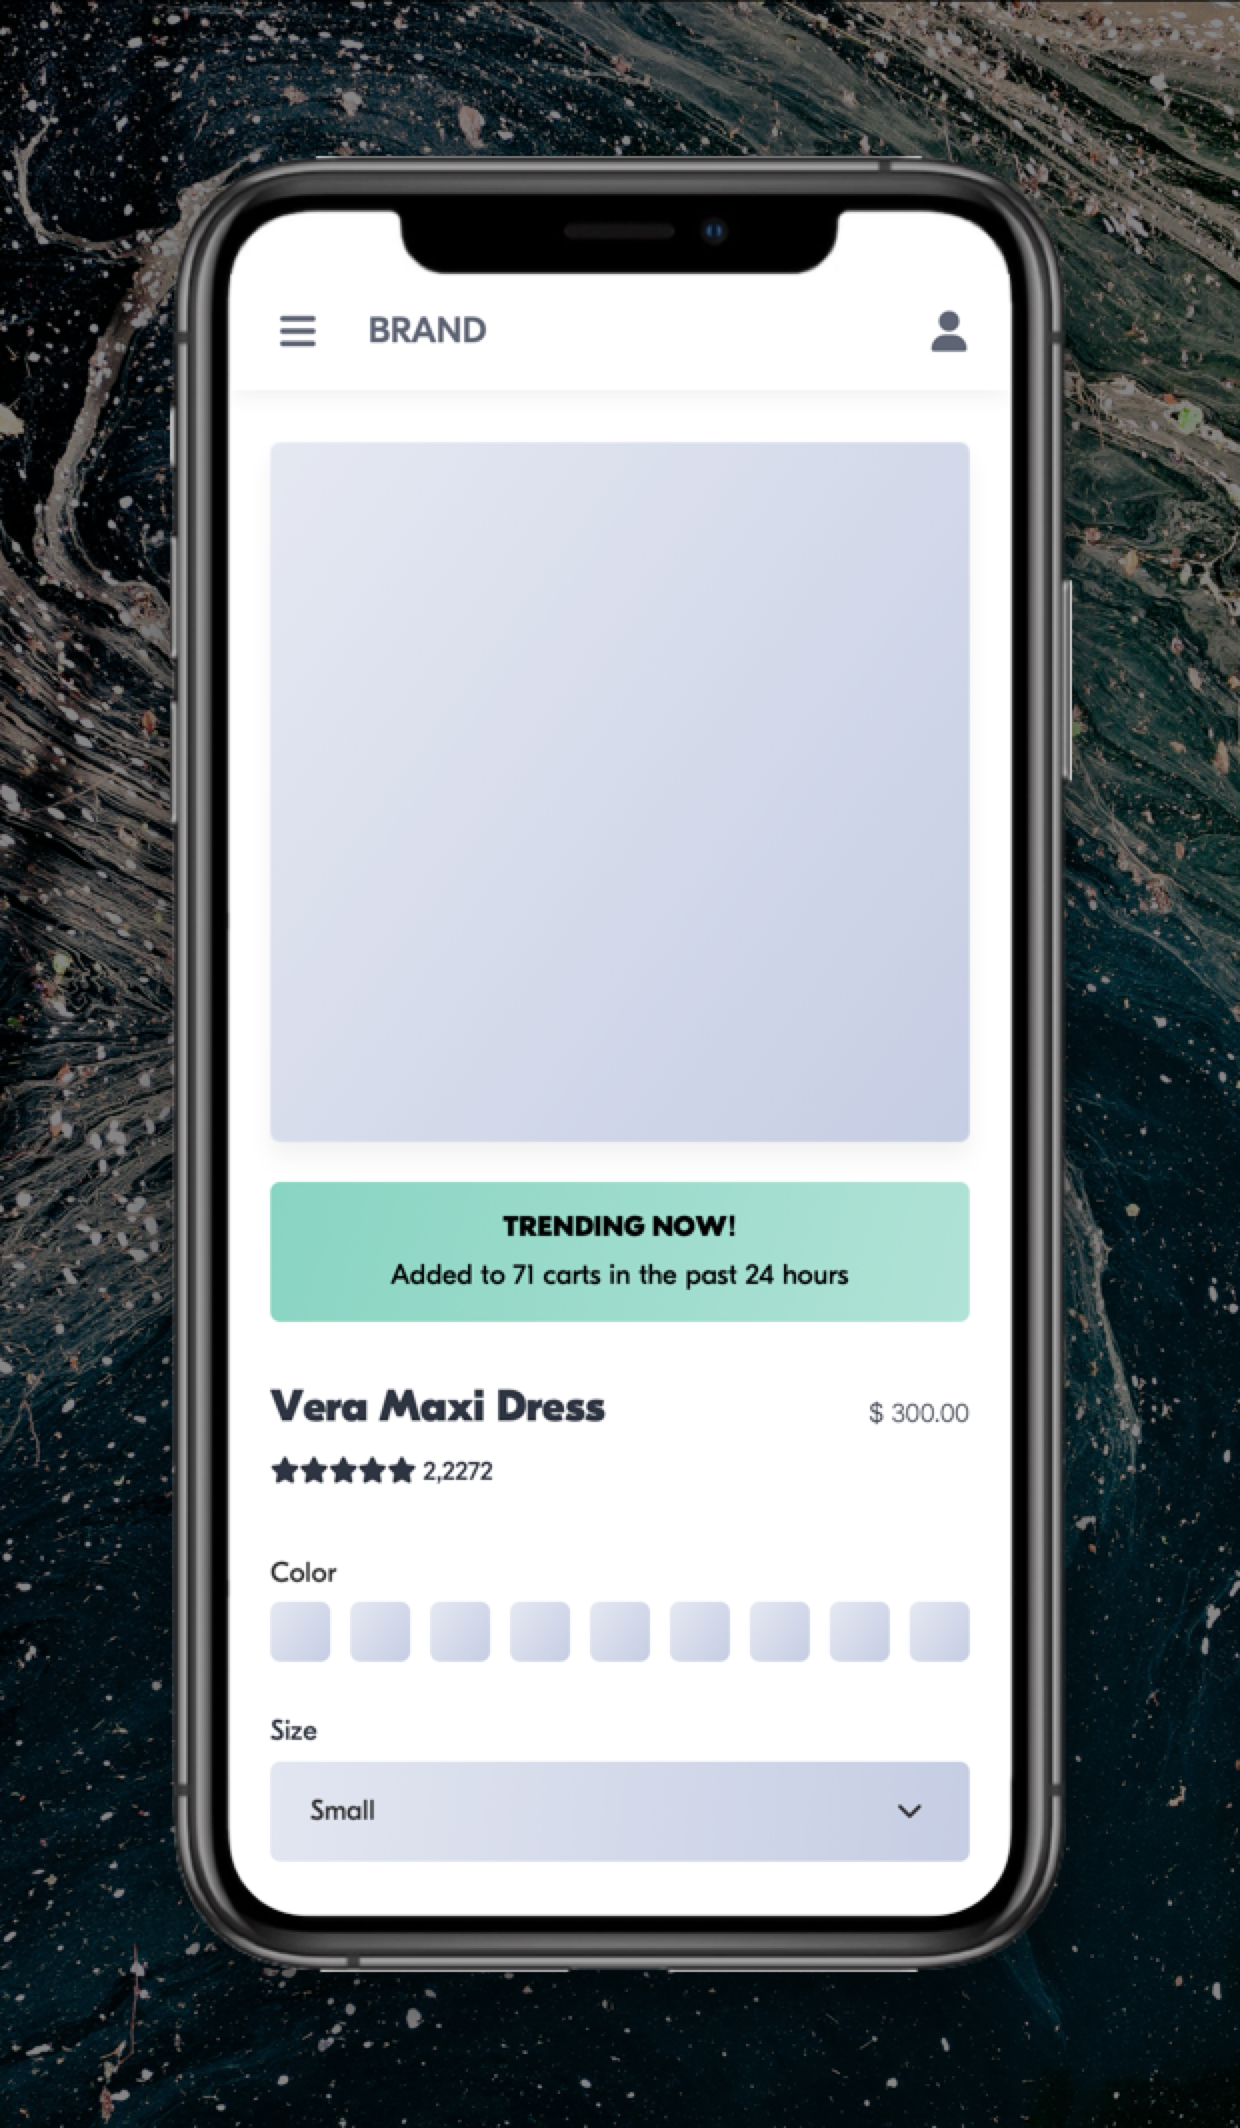
By displaying the amount of times a product was added to cart, we create both social proof and a sense of urgency, increasing add-to-cart and conversion rate significantly.
 |
Potential uplift of 7% to 10% in CR. |
Setting up the experience on Visually:
BUILD TIME: 2 MINUTES
Step 1 - Set the scope
Start by defining the conditions required for the experience to activate.
Please keep in mind that the reports will gather data based on the defined scope, so accuracy is key. Setting a scope larger than required can dilute the data by including sessions which weren’t actually impacted by the changes.
Audience → make sure that this parameter is set to ‘All Visitors‘.
Pages → set to ‘All Products‘.

Devices → set to 'Mobile Only'.

Trigger → make sure that this parameter is set to 'Page Load'.
Step 2 - Set the changes
Navigate to your best selling product → click on the navigation pane → select the product page from the list.


Add a ‘Social Proof’ content block → set the position below the main product image → click on ‘Content Blocks’ → click on ‘Social Proof’


Set the widget’s parameters → for this experience, select the following parameters:
- ADDED TO CART IN THE PAST X TIME
- TIMEFRAME: DAY
- EXACT NUMBER
It's important to set the threshold based on your store's traffic levels. We suggest beginning with a threshold of 100 and adjusting it over time to determine what works best for your store.

Set the text block → adjust the message. You can use the variables $value and $timeframe to represent the dynamic parts of the message.
We recommend maintaining accurate figures, as exaggerating them may lead to unfavorable consequences over time.

Tailor the design → align the changes’ design to fit your brand identity.
We recommend saving your stylings for future use. For more information on reusing styles, refer to this article.


Save the experience → click on 'Save' → name the experience → provide a description (optional) → click 'Next' to confirm.

Step 3 - Preview & QA
To ensure that the experience functions correctly before publishing, we strongly recommend conducting a quality assurance (QA) session using our ‘Preview’ feature.
- Click on ‘Preview’ → ‘Share’ → ‘Copy Link’
- Use this link on the target device(s) for more accurate insights.
For optimal results, we suggest running this QA in incognito mode to eliminate any cookies that may influence the testing process. - For additional guidance on performing quality assurance with Visually, please refer to this article.
Step 4 - Finalize & Publish
We highly recommend conducting an A/B validation to evaluate the impact of this experience on your store's performance.
To begin → click on ‘Next’.
Initiate an A/B test → navigate to section 3 and select ‘Yes, sure’.
Name the variation(s) → we suggest naming variations based on the hypothesis you’re testing and how they differ from each others, such as:
- Original / ATC Day
- Original / min. 100
- ATC Day / ATC Week
- ATC Day / Bought Day
- min. 100 / min. 200 / min. 500
Determine the allocation → we suggest starting with a 50/50 split to obtain results quickly and reliably.
- If you prefer to conduct a preliminary sanity check, consider a 80/20 allocation for initial validation, then transition to 50/50 for comprehensive testing.
- Keep in mind that achieving statistical significance may take several days, especially with lower allocations. For guidance on analyzing and monitoring your A/B tests, refer to this article.

Set the metric goals → click on ‘+’ to select goals → for this experience, we recommend the following KPIs:
- Conversion Rate
- Average Order Value
- Per Session Value
- Add to Cart Rate
- Checkout Rate
Set the primary metric → we recommend setting Conversion Rate.
Send metrics to GA4 (optional) → check the box for ‘Send events to Google Analytics’.

Publish the experience → click on ‘Publish’ and confirm when ready.
.png?width=744&height=1618&name=M%20-%20PDP%20-%20Social%20Proof%20(REVOLVE).png)
 Watch our step-by-step walkthrough video
